先日、立体ボックスを構成する一面に画像を貼り付けて回転することにより、スライダー風に画像を表示する記事を投稿しました。
今回はそのアレンジバージョンで、画像をマウスオーバーした時のアニメーションを変えてみました。
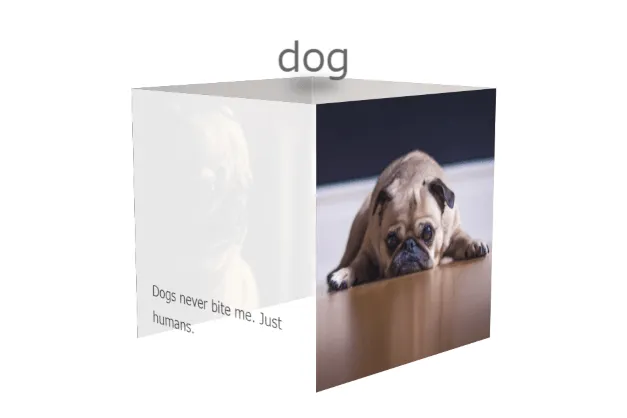
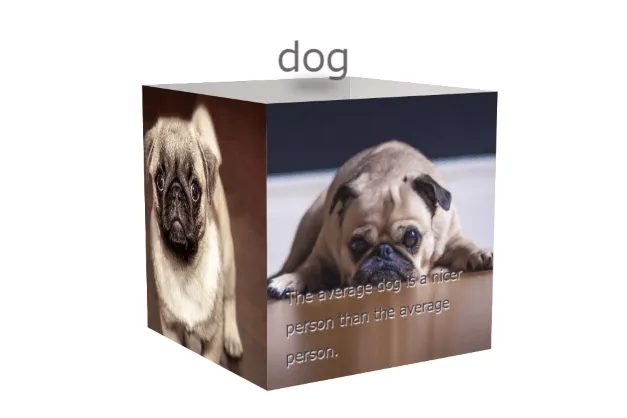
画像が上にスライドして下に隠れていたテキストが表示されるもの(スライドアップバージョン)、画像が回転して裏面のテキストが表示されるもの(回転バージョン)、画像が上へ押し開きするもの(押し開きバージョン)の3つ作成しました。
ご参考になれば幸いです。
使用するファイル
今回も同様、以下のみです。
- HTMLファイル(このファイルは、読み込み画像だけ変更していますが、その他は前回と同じものを流用しています。)
- CSSファイル
スライドアップバージョン
CODEPENで実装と確認
「Run Pen」をクリックしてください。
See the Pen cube slider slideup by blue moon (@blue-moon) on CodePen.
マウスオーバーしてスライドアップしても、立体ボックスからはみ出ている部分は表示されませんので、タイトル(ここでは「dog」)に重なって見えなくなることはありません。
HTMLファイル
<body>
  <div class="container">
    <div class="title">
      <p>dog<span class="box"></span></p>
    </div>
    <ul class="cube">
      <li class="top">
      </li>
      <li class="front">
        <div class="image-box">
          <img src="yourpath" alt="pug-1">
          <p class="name">Happiness is a warm puppy.</p>
        </div>
      </li>
      <li class="right">
        <div class="image-box">
          <img src="yourpath" alt="pug-2">
          <p class="name">Dogs never bite me. Just humans.</p>
        </div>
      </li>
      <li class="back">
        <div class="image-box">
          <img src="yourpath" alt="pug-3">
          <p class="phrase">The average dog is a nicer person than the average person.</p>
        </div>
      </li>
      <li class="left">
        <div class="image-box">
          <img src="yourpath" alt="pug-4">
          <p class="name">Dogs’ lives are too short. Their only fault, really.</p>
        </div>
      </li>
    </ul>
  </div>
</body>
CSSファイル
/* reset&base */
body {
  font-size: 12px;
  color: #666;
}

ul {
  margin: 0;
  padding: 0;
  list-style: none;
}

li {
  line-height: 1.8;
}

p {
  margin: 0;
}

a {
  color: inherit;
  text-decoration: none;
}

.container {
  position: relative;
  margin: 70px auto;
  width:90%;
  perspective: 1000px;
}

.container .title {
  position: absolute;
  top: -3.5rem;
  width: 100%;
  z-index: 10;
  font-size: 2.5rem;
  text-align: center;
}

.container .title p {
  position: relative;
  display: inline-block;
  width: min-content;
  font-size: 2rem;
}

.box {
  position: absolute;
  top: 90%;
  left: 15%;
  display: inline-block;
  width: 70%;
  height: 3px;
  border-radius: 50%;
  background-color: #000;
  filter: blur(5px);
}

/* 立方体 */
.cube {
  position:relative;
  margin: 30px auto;
  width: 200px;
  height: 200px;
  transform-style: preserve-3d; /* 子要素を3D空間 */
  animation: rotate 20s linear infinite;
}

@keyframes rotate {
  from {
    transform: rotateX(-10deg) rotateY(20deg);
  }
  to {
    transform: rotateX(-10deg) rotateY(-340deg);
  }
}

.cube:hover{
  animation-play-state: paused; /* 回転一時停止 */
}

.cube li {
  position:absolute;
  left:0;
  right:0;
  width:100%;
  height:100%;
}

.top {
  transform: translate3d(0, -100px, 0) rotateX(90deg);
  background-color: #fff;
  opacity: 0.7;
}

.front {
  transform: translate3d(0, 0, -100px);
}

.right {
  transform: translate3d(-100px, 0, 0) rotateY(90deg);
}

.back {
  transform: translate3d(0px, 0px, 100px) rotateY(180deg);
}

.left {
  transform:translate3d(100px, 0, 0) rotateY(-90deg);
}

.image-box {
  position: relative;
  display: flex;
  justify-content: center;
  overflow: hidden;
}

img {
  width: auto;
  height: 200px;
  transition: all 1s ease;
}

.image-box p {
  position: absolute;
  top: 0%;
  padding: 5% 10%;
  display: flex;
  align-items: flex-end; /* 文字を下揃え */
  box-sizing: border-box;
  width: 200px;
  height: 100%;
  background-color: #fff;
  color: #333;
  opacity: 0.9;
  z-index: -1;
  transform: rotateY(-180deg);
  transition: 1.5s ease-in;
}

.image-box:hover img {
  transform: translateY(-200px);
}

.image-box:hover p {
  z-index: 1;
}
補足説明
テキストを記載しているPタグに {display: flex; align-items: flex-end;} と記述することで、テキストの下揃えを実現しています。因みにこのPタグには子要素はありません。
もし、上揃えで構わないということであれば、この箇所は削除して問題ございません。
※後日追記 後から気づいたのですが、立方体を作成する時に画像を左右反転にしている箇所がありました。未修整ですので、ご調整下さい。
回転バージョン
CODEPENで実装と確認
See the Pen cube slider rotate by blue moon (@blue-moon) on CodePen.
CSSファイル
/* reset&base */
body {
  font-size: 12px;
  color: #666;
}

ul {
  margin: 0;
  padding: 0;
  list-style: none;
}

li {
  line-height: 1.8;
}

p {
  margin: 0;
}

a {
  color: inherit;
  text-decoration: none;
}

.container {
  position: relative;
  margin: 70px auto;
  width:90%;
  perspective: 1000px;
}

.container .title {
  position: absolute;
  top: -3.5rem;
  width: 100%;
  z-index: 10;
  font-size: 2.5rem;
  text-align: center;
}

.container .title p {
  position: relative;
  display: inline-block;
  width: min-content;
  font-size: 2rem;
}

.box {
  position: absolute;
  top: 90%;
  left: 15%;
  display: inline-block;
  width: 70%;
  height: 3px;
  border-radius: 50%;
  background-color: #000;
  filter: blur(5px);
}

/* 立方体 */
.cube {
  position:relative;
  margin: 30px auto;
  width: 200px;
  height: 200px;
  transform-style: preserve-3d;
  animation: rotate 20s linear infinite;
}

@keyframes rotate {
  from {
    transform: rotateX(-10deg) rotateY(20deg);
  }
  to {
    transform: rotateX(-10deg) rotateY(-340deg);
  }
}

.cube:hover{
  animation-play-state: paused;
}

.cube li {
  position:absolute;
  left:0;
  right:0;
  width:100%;
  height:100%;
}

.top {
  transform: translate3d(0, -100px, 0) rotateX(90deg);
  background-color: #fff;
  opacity: 0.7;
}

.front {
  transform: translate3d(0, 0, -100px);
}

.right {
  transform: translate3d(-100px, 0, 0) rotateY(90deg);
}

.back {
  transform: translate3d(0px, 0px, 100px) rotateY(180deg);
}

.left {
  transform:translate3d(100px, 0, 0) rotateY(-90deg);
}

.image-box {
  position: relative;
}

img {
  width: 100%; /* 画像はフレームと同じアスペクト比に切り取り済み */
  height: 100%;
  transition: all 0.5s ease-in-out;
}

.image-box p {
  position: absolute;
  top: 0%;
  padding: 5% 10%;
  display: flex;
  align-items: flex-end;
  box-sizing: border-box;
  width: 200px;
  height: 100%;
  background-color: #fff;
  color: #333;
  opacity: 0.9;
  z-index: -1;
  transition: all 0.5s ease-in-out;
  backface-visibility : hidden;
}

.image-box:hover img {
  transform: rotateY(180deg);
}

.image-box:hover p {
  z-index: 1;
  transform: rotateY(-180deg);
  backface-visibility : visible;
}
補足説明
画像は親要素と同じ大きさにアスペクト比に切り取っておいてください。そうしなければ、親要素に {overflow: hidden;} と記述していても、回転する時に親要素にからはみ出していた部分が一瞬見えてしまいます。
backface-visibilityプロパティによって、画像に背面にテキストを貼り付けているイメージです。
回転する時に他の面の画像をチラ見せできるのも、興味を引き出せると思います。
この時、他の面の背面にはテキストが表示されていません。{z-index: -1;} としているためです。
画像が回転することではじめてテキストが表示されます。
※後日追記 後から気づいたのですが、立方体を作成する時に画像を左右反転にしている箇所がありました。未修整ですので、ご調整下さい。
押し開きバージョン
CODEPENで実装と確認
See the Pen cube slider open by blue moon (@blue-moon) on CodePen.
CSSファイル
/* reset&base */
body {
  font-size: 12px;
  color: #666;
}

ul {
  margin: 0;
  padding: 0;
  list-style: none;
}

li {
  line-height: 1.8;
}

p {
  margin: 0;
}

a {
  color: inherit;
  text-decoration: none;
}

.container {
  position: relative;
  margin: 70px auto;
  width:90%;
  perspective: 1000px;
}

.container .title {
  position: absolute;
  top: -3.5rem;
  width: 100%;
  z-index: 10;
  font-size: 2.5rem;
  text-align: center;
}

.container .title p {
  position: relative;
  display: inline-block;
  width: min-content;
  font-size: 2rem;
}

.box {
  position: absolute;
  top: 90%;
  left: 15%;
  display: inline-block;
  width: 70%;
  height: 3px;
  border-radius: 50%;
  background-color: #000;
  filter: blur(5px);
}

/* 立方体 */
.cube {
  position:relative;
  margin: 30px auto;
  width: 200px;
  height: 200px;
  transform-style: preserve-3d;
  animation: rotate 20s linear infinite;
}

@keyframes rotate {
  from {
    transform: rotateX(-10deg) rotateY(20deg);
  }
  to {
    transform: rotateX(-10deg) rotateY(-340deg);
  }
}

.cube:hover{
  animation-play-state: paused;
}

.cube li {
  position:absolute;
  left:0;
  right:0;
  width:100%;
  height:100%;
}

.top {
  transform: translate3d(0, -100px, 0) rotateX(90deg);
  background-color: #fff;
  opacity: 0.7;
}

.front {
  transform: translate3d(0, 0, -100px);
}

.right {
  transform: translate3d(-100px, 0, 0) rotateY(90deg);
}

.back {
  transform: translate3d(0px, 0px, 100px) rotateY(180deg);
}

.left {
  transform:translate3d(100px, 0, 0) rotateY(-90deg);
}

.image-box {
  position: relative;
}

img {
  width: 100%; /* 画像は、画像が入るのフレームと同じアスペクト比に切り取り済み */
  height: 100%;
  transform-origin: center top 0px;
  transition: all 0.7s ease 0s;
}

.image-box p {
  position: absolute;
  top: 0%;
  padding: 5% 10%;
  display: flex;
  align-items: flex-end;
  box-sizing: border-box;
  width: 200px;
  height: 100%;
  background-color: #fff;
  color: #333;
  opacity: 0.9;
  z-index: -1;
  transform: rotateY(-180deg);
}

.image-box:hover img { transform:matrix3d(1,0,0.00,0,0.00,0,1.00,0.008,0,-1,0,0,0,0,0,1);
}
補足説明
一番最後の {transform:matrix3d( );} によって、奥へ画像を押し上げています。matrix3dは難しいですね。
諳で書けるようになりたいものですが、検索するとジェネレーターもありますので、これを利用すれば意外と簡単にできてしまいます。
お薦めの各ジェネレーターについては、記事作成中ですので、そのうち投稿したいと思います。

